10.2 Transformer 代码详解
10. 2 Transformer 代码详解
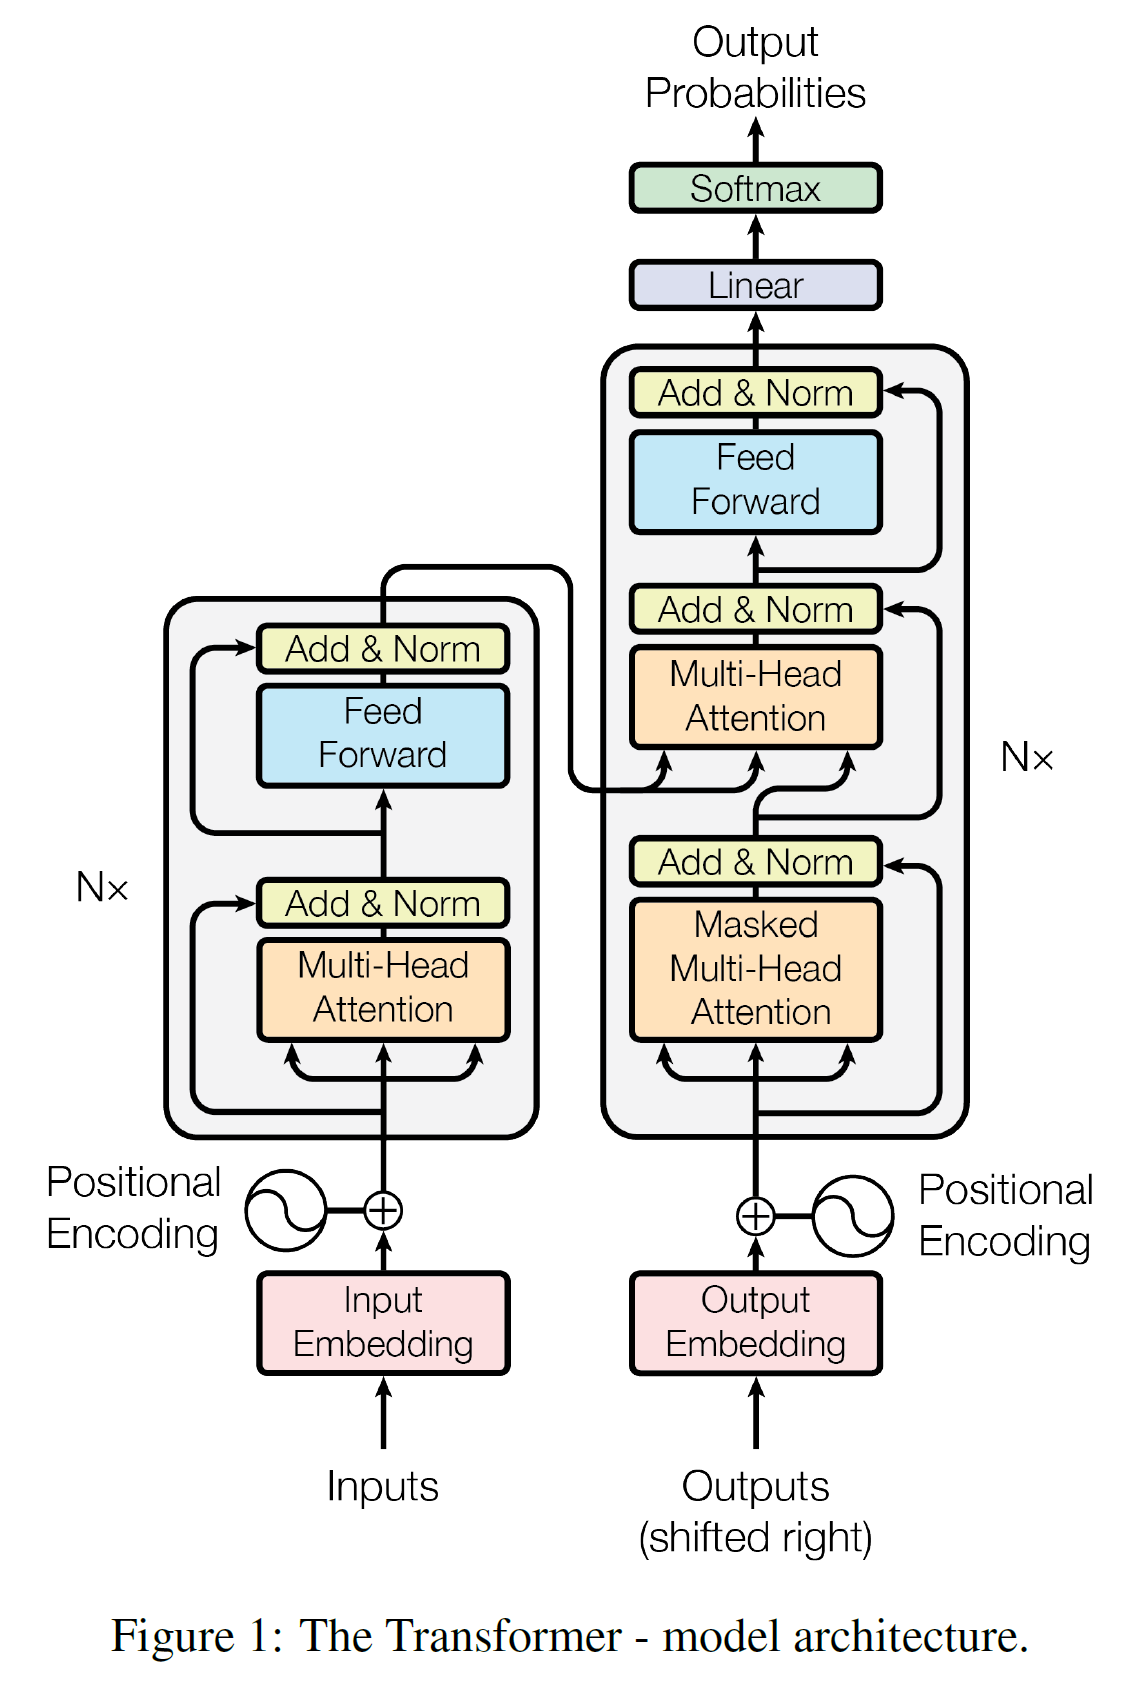
按照上图结构, 如果作者需要Encoder和Decoder这个主干结构,作者需要实现encoder和decoder最主要两个结构。
而encoder 和 decoder两个部分主要由:
- positional encoding
- pad mask
- ScaledDotProductAttention
- MultiHeadAttention
- PoswiseFeedForwardNet
因此,本文逻辑为,
- 每个子组件实现
- 实现encoder layer 和 decoder layer
- 实现Transformer
所有代码来自于 nlp-tutorial中的5-1.Transformer。
1. 每个子组件实现
1.positional encoding
multi-head self-attention 机制抛弃RNNs架构,使得模型能够并行计算,能获取句子中长矩依赖信息。但是当每个句子同步流过Transformer encoder和decoder结构时,模型没有了每个词的任何关于位置、顺序的信息。但Transformer又需要词的顺序——位置信息。
为了添加位置信息,论文中是引入位置编码。
we add “positional encodings” to the input embeddings at the bottoms of the encoder and decoder stacks. The positional encodings have the same dimension $d_{model}$ as the embeddings, so that the two can be summed. There are many choices of positional encodings,learned and fixed。
然后给出了位置编码公式:
为了简化计算做一点小的调整:

这就是div_term。
1 | class PositionalEncoding(nn.Module): |
2. mask
- padding mask
在模型中,一般是以batch形式输入,那么每个句子不一样时要补到最大长度。一般是0,但是这种填充位置信息是没意义的,即影响计算效率,又影响模型效果。
要避免这种影响,最后把softmax后的分数置为0。
如上公式中,只能将分子部分,就是将 $ i = -\infty $, 这里取 $ 10^{-9}$.
padding mask 实际上是一个张量,每个值都是一个Boolean,值为 false 的地方就是作者要进行处理的地方。
1 | def get_attn_pad_mask(seq_q, seq_k): |
- Sequence mask
sequence mask 是为了使得 decoder 不能看见未来的信息。也就是对于一个序列,在 time_step 为 t 的时刻,作者的解码输出应该只能依赖于 t 时刻之前的输出,而不能依赖 t 之后的输出。因此作者需要想一个办法,把 t 之后的信息给隐藏起来。
那么具体怎么做呢?就是:产生一个上三角矩阵,上三角的值全为0。把这个矩阵作用在每一个序列上,就可以达到作者的目的。
1 | def get_attn_subsequence_mask(seq): |
实际效果:
1 | print(np.triu(np.ones((2, 3)), k=1)) |
注:
- 对于 decoder 的 self-attention,要避免decoder后面信息,里面使用到的 scaled dot-product attention,同时需要padding mask 和 sequence mask 作为 attn_mask,具体实现就是两个mask相加作为attn_mask。
- 其他情况,attn_mask 一律等于 padding mask。
3.ScaledDotProductAttention
放缩点乘注意力机制如下图,具体公式如下:最后得到context向量和attn分数。
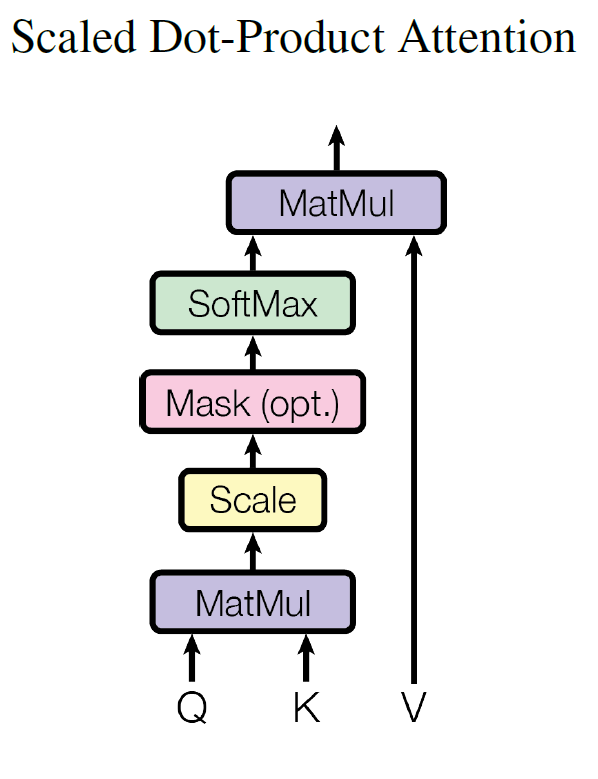
除以$ d_k $是因为当QK乘积后会非常大,这能起到一定规模缩小的作用,不进入softmax梯度非常小区域1
2
3
4
5
6
7
8
9
10
11
12
13
14
15
16
17
18
19class ScaledDotProductAttention(nn.Module):
def __init__(self):
super(ScaledDotProductAttention, self).__init__()
def forward(self, Q, K, V, attn_mask):
'''
Q: [batch_size, n_heads, len_q, d_k]
K: [batch_size, n_heads, len_k, d_k]
V: [batch_size, n_heads, len_v(=len_k), d_v]
attn_mask: [batch_size, n_heads, seq_len, seq_len]
'''
#按照公式写出softmax里的部分, 因为K最后两个维度是 len_k, d_k交换下和Q做点乘
scores = torch.matmul(Q, K.transpose(-1, -2)) / np.sqrt(d_k) # scores : [batch_size, n_heads, len_q, len_k]
#填充mask为0部分为-1e9
scores.masked_fill_(attn_mask, -1e9) # Fills elements of self tensor with value where mask is True.
attn = nn.Softmax(dim=-1)(scores)
context = torch.matmul(attn, V) # [batch_size, n_heads, len_q, d_v]
return context, attn
4. MultiHeadAttention
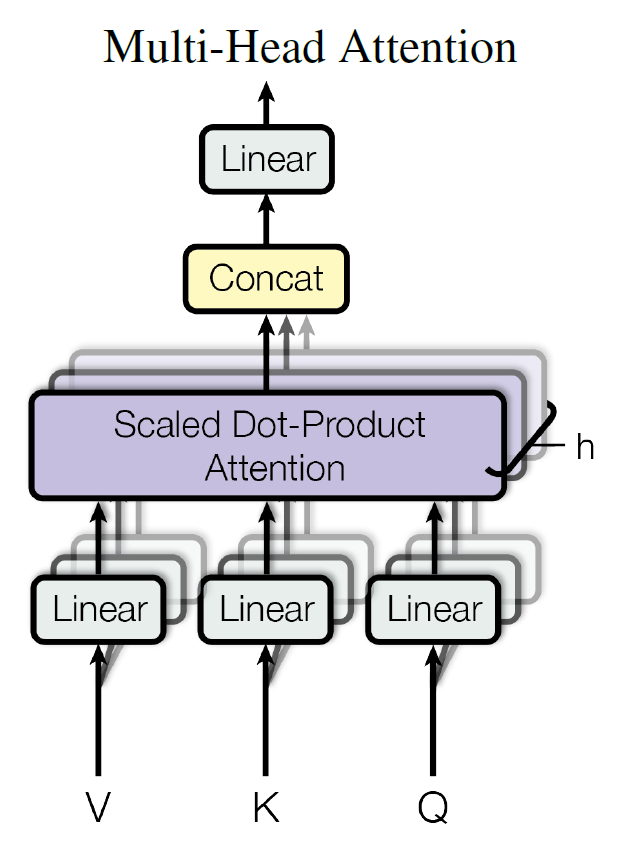
如果作者只计算一个attention,很难捕捉输入句中所有空间的讯息,为了优化模型,论文当中提出了一个新颖的做法:Multi-head attention。
文中8个注意力头,即把k, q, v投影到8个不同空间去,如$kW^{k_1}$等。注意,多头自注意力也引入了残差和layerNorm.
即:
1 | class MultiHeadAttention(nn.Module): |
这里还有份非常详细解释实现的pytorch实验代码,帮助理解。
2
3
4
5
6
7
8
9
10
11
12
13
14
15
16
17
18
19
20
21
22
23
24
25
26
27
28
29
30
31
32
33
34
35
36
37
38
39
40
41
42
43
44
45
46
47
48
49
50
51
52
53
54
55
56
57
58
59
60
61
62
63
64
65
66
67
68
69
70
71
72
73
74
75
76
77
78
79
80
81
82
83
84
85
86
87
88
89
90
91
92
93
94
95
96
97
98
99
import torch.nn as nn
query = torch.rand(12, 64, 300) #batch_size为64, 每个batch为12个词, query向量为300维
key = torch.rand(10, 64, 300)
value = torch.rand(10, 64, 300)
embedding_dim = 300
num_heads = 2
#使用nn.MultiheadAttention
multihead_attn = nn.MultiheadAttention(embedding_dim, num_heads)
attn_output = multihead_attn(query, key, value)[0]
# print(attn_output)
print(attn_output.shape)
class MultiheadAttention(nn.Module):
# n_heads:多头注意力的数量
# hid_dim:每个词输出的向量维度
def __init__(self, hid_dim, n_heads, dropout=0.1):
super(MultiheadAttention, self).__init__()
self.hid_dim = hid_dim
self.n_heads = n_heads
# 强制 hid_dim 必须整除 h
assert hid_dim % n_heads == 0
# 定义 W_q 矩阵
self.w_q = nn.Linear(hid_dim, hid_dim)
# 定义 W_k 矩阵
self.w_k = nn.Linear(hid_dim, hid_dim)
# 定义 W_v 矩阵
self.w_v = nn.Linear(hid_dim, hid_dim)
self.fc = nn.Linear(hid_dim, hid_dim)
self.drop = nn.Dropout(dropout)
# 缩放
self.scale = torch.sqrt(torch.FloatTensor([hid_dim // n_heads]))
def forward(self, query, key, value, mask=None):
# K: [64,10,300], batch_size 为 64,有 12 个词,每个词的 value 向量是 300 维
# V: [64,10,300], batch_size 为 64,有 12 个词,每个词的 key 向量是 300 维
# Q: [64,12,300], batch_size 为 64,有 12 个词,每个词的 Query 向量是 300 维
bsz = query.shape[0]
Q = self.w_q(query)
K = self.w_k(key)
V = self.w_v(value)
# 这里把 K Q V 矩阵拆分为多组注意力,变成了一个 4 维的矩阵
# 最后一维就是是用 self.hid_dim // self.n_heads 来得到的,表示每组注意力的向量长度, 每个 head 的向量长度是:300/6=50
# 64 表示 batch size,6 表示有 6组注意力,10 表示有 10 词,50 表示每组注意力的词的向量长度
# K: [64,10,300] 拆分多组注意力 -> [64,10,6,50] 转置得到 -> [64,6,10,50]
# V: [64,10,300] 拆分多组注意力 -> [64,10,6,50] 转置得到 -> [64,6,10,50]
# Q: [64,12,300] 拆分多组注意力 -> [64,12,6,50] 转置得到 -> [64,6,12,50]
# 转置是为了把注意力的数量 6 放到前面,把 10 和 50 放到后面,方便下面计算
Q = Q.view(bsz, -1, self.n_heads, self.hid_dim //
self.n_heads).permute(0, 2, 1, 3)
K = K.view(bsz, -1, self.n_heads, self.hid_dim //
self.n_heads).permute(0, 2, 1, 3)
V = V.view(bsz, -1, self.n_heads, self.hid_dim //
self.n_heads).permute(0, 2, 1, 3)
# 第 1 步:Q 乘以 K的转置,除以scale
# [64,6,12,50] * [64,6,50,10] = [64,6,12,10]
# attention:[64,6,12,10]
attention = torch.matmul(Q, K.permute(0, 1, 3, 2)) / self.scale
# 把 mask 不为空,那么就把 mask 为 0 的位置的 attention 分数设置为 -1e10
if mask is not None:
attention = attention.masked_fill(mask == 0, -1e10)
# 第 2 步:计算上一步结果的 softmax,再经过 dropout,得到 attention。
# 注意,这里是对最后一维做 softmax,也就是在输入序列的维度做 softmax
# attention: [64,6,12,10]
attention = self.drop(torch.softmax(attention, dim=-1))
# 第三步,attention结果与V相乘,得到多头注意力的结果
# [64,6,12,10] * [64,6,10,50] = [64,6,12,50]
# x: [64,6,12,50]
x = torch.matmul(attention, V)
# 因为 query 有 12 个词,所以把 12 放到前面,把 5 和 60 放到后面,方便下面拼接多组的结果
# x: [64,6,12,50] 转置-> [64,12,6,50]
x = x.permute(0, 2, 1, 3).contiguous()
# 这里的矩阵转换就是:把多组注意力的结果拼接起来
# 最终结果就是 [64,12,300]
# x: [64,12,6,50] -> [64,12,300]
x = x.view(bsz, -1, self.n_heads * (self.hid_dim // self.n_heads))
x = self.fc(x)
return x
# batch_size 为 64,有 12 个词,每个词的 Query 向量是 300 维
query = torch.rand(64, 12, 300)
# batch_size 为 64,有 12 个词,每个词的 Key 向量是 300 维
key = torch.rand(64, 12, 300)
# batch_size 为 64,有 12 个词,每个词的 Value 向量是 300 维
value = torch.rand(64, 12, 300)
attention = MultiheadAttention(hid_dim=300, n_heads=6, dropout=0.1)
output = attention(query, key, value)
# output: torch.Size([64, 12, 300])
print(output.shape)
5. PoswiseFeedForwardNet
因为加入了残差连接,就是输入变成了 $ x + f(x) $,实际上这里变成了$x+\text{FFN } (x) $.然后再过LayerNorm。
1 | class PoswiseFeedForwardNet(nn.Module): |
2. 实现encoder layer 和 decoder layer
1. encoder layer
每层encoder layer有一个多头自注意力,和一个position-wise全连接前馈神经网络构成。需要注意的是还有个attention 流向decoder。
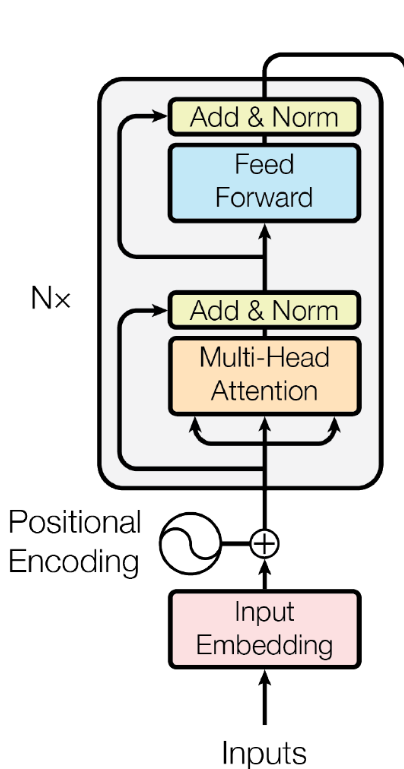
详细如下结构如下,
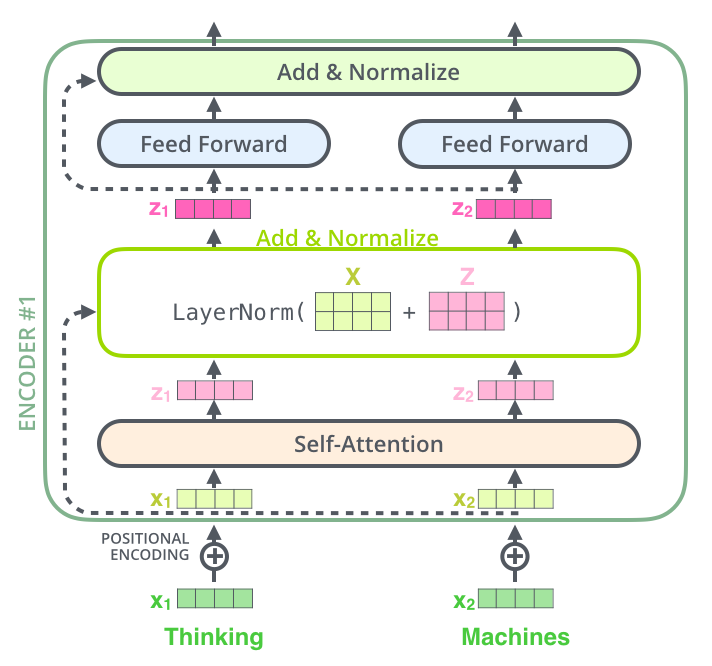
1 | class EncoderLayer(nn.Module): |
2. decoder layer
decoder layer要2个多头自注意力,就是两个多头和一个position-wise全连接前馈神经网络。在 Decoder Layer 中会调用两次 MultiHeadAttention,第一次是计算 Decoder Input 的 self-attention,得到输出 dec_outputs。然后将 dec_outputs 作为生成 Q 的元素,enc_outputs 作为生成 K 和 V 的元素,再调用一次 MultiHeadAttention,得到的是 Encoder 和 Decoder Layer 之间的 context vector。最后将 dec_outptus 做一次维度变换,然后返回 dec_outputs, dec_self_attn, dec_enc_attn
1 | class DecoderLayer(nn.Module): |
3. 整个encoder 和 decoder构成的Transformer
1. 实现encoder
整个encoder部分构成为:
pad_masked(源语言词嵌入 + 位置嵌入)+ list(encoder layer),返回 encoder 输出和 self attention
1 | class Encoder(nn.Module): |
2. 实现decoder
decoder 跟encoder区别在于decoder 的attention分为self attention和 encoder 输出作为K, V 上一层 decoder attention输出作为Q的attention的decoder-encoder attention。
1 | class Decoder(nn.Module): |
3. 实现Transformer
1 | class Transformer(nn.Module): |
完整代码实现在 Transformer-Torch
如果想跑整个论文机翻的话,用这个实现 attention-is-all-you-need-pytorch
Inference
[1] attention
[2] Seq2seq pay Attention to Self Attention: Part 2 中文版
[4] Transformer 详解
[5] Transformer


